Preface
Throughout my software engineering course, there are a few (specifically four) projects which I figure would be an excellent opportunity to start doing some personal writing again in the form of a development blog. I’ll be trying to keep up with this as I complete the project (due June 4, 2021). In the interest of keeping relevant articles on blogs on relevant domains, writing this blog will necessitate some updates to una-ada.github.io, including but not limited to finally finishing the layouts, rewriting the index, and adding a new (custom) font for code blocks. If I happen to write anything about that particular process (which I definitely will for at least the font design), those blogs will not be included in the sequence of these, tho I may include links to them if I find that to be of interest at the time.
So, about this project then. This is the first of out projects, pairing up with the introductory module on HTML, CSS, and JS. As this is only the introductory section, we’re not using any frameworks or libraries, simply vanilla JS with rendering handled through DOM manipulation, which is an interesting limitation as the goal here is to create a browser-based game. We only have a week and some change to complete it, so this limitation isn’t too absurd as we’re likely not going to be making anything that would absolutely require a different rendering method (e.g. canvas). That’s really all there is to it: make a browser game; obviously there’s also the additional requirements to show specific competencies along the lines of documentation, legible code, codebase consistency, published via Github Pages, etc., but those aren’t particular to the goal here.
I. Concept
The first step in any project is simply deciding what to do. This step is sort of skipped in most personal projects, one acts on the ideas they have and a project is formed, but with an assignment there is a certain necessity of putting some thought into this. Of course, I decided to not think of it much and just picked from my nearly infinite stack of unfinished projects, namely those which require a complete rewrite and could meet the given requirements. So, I’ll go over what that project was, what it should be, and how I’m planning to get there in this section.
I-1. Background
Let’s take a brief look back to some time around 2013 for context. As a high school student who had stumbled into programming as a hobby, I wanted to take on some sort of project to expand my knowledge, particularly in the direction of web services, and decided during some typical sleepless night to follow along with a social network tutorial in PHP (in a LAMP stack, but I was on windows so it was really a WAMP stack in the end). This little project would continue on under the name “Graphene” in reference to its intended connectivity and because I just thought it was neat. A little while passed (around 2014 now) and I wanted to start having this project publicly available to share with people! The name itself isn’t super common, but it is a real word and one that refers to a product that can be a pretty big deal, so there was no way in hell I’d be able to afford a “graphene.*” domain with my dozens of dollars. As a compromise, a little loophole was pulled and the end domain was “gra.phene.co” (this is definitely down nowadays, by the way). With the project on a subdomain like this, the opportunity to create a developer group (not quite a legal company, but it could’ve been some day) with a pretty much already decided name appeared.
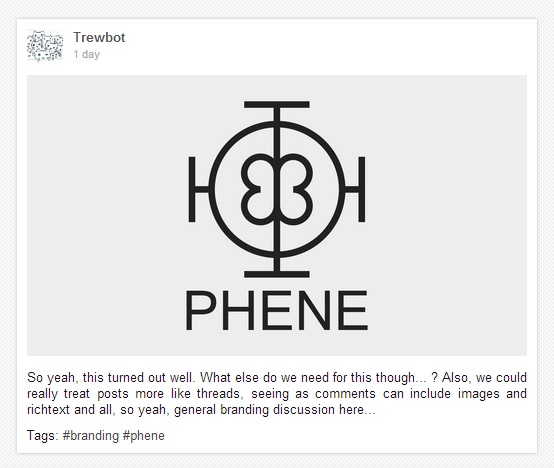
FIGURE 1. Screenshot of the original Phene logo design in a post on Graphene
(March 27, 2015). As far as I know, this is the only copy I have right now.
This group was clearly to be named Phene Co. and consisted of myself and sometimes one of my friends from back in middle school (he has a programming job and everything now, congrats to him). Being very design-oriented myself, I just had to come up with some branding for this! I started with the idea of writing the name out in cyrillic (фен), combining the letters, and ending up with FIGURE 1. Down the line this was simplified to be basically just a rounded letter phi (“ф”), but I wanted something more alive. Then came the idea that the letter could be seen as a ringed planet from the side of its rings, so I created an alternative version from another perspective. One object from two angles is just ripe for animation, right? So that’s what I did! See FIGURE 2.
FIGURE 2. Redesigned Phene logo with animation (30 frames).
This design gave me a very fun idea for how the website should look: the planet would sit in the middle being orbited by little moons, and when you scrolled down to the next section then planet would move over to the side while switching to the phi and the moons would all fall into place to act as section anchors. I tried to make that and I found out it’s really hard to get objects to animate the way you want from arbitrary positions to set positions, especially when they were already animated… so there was but one solution to this: actually write the animation as a gravity simulation. Somehow I managed to make that (the logo animation notwithstanding) and it’s still available for viewing at pheneco.github.io.
There’s no way that was enough though, right? I made this cute little gravity simulator and it was all for one “simple” animation? I couldn’t have that, I wanted to play with it more! And that’s just what I did. I moved the animation over to a new document and started adding user inputs: clicking would create a new moon, holding would increase its mass, dragging would set the velocity, and when you let go it would set off in the direction you indicate. I also did a fair bit of extra design: little tooltips to show mass and velocity, a sun for the planet to orbit, settings to change to dark mode or follow different objects, it became quite fun and you can check that version out here. I’m actually quite fond of how the UI turned out, it looks clean and, as far as I can tell, is fairly intuitive:
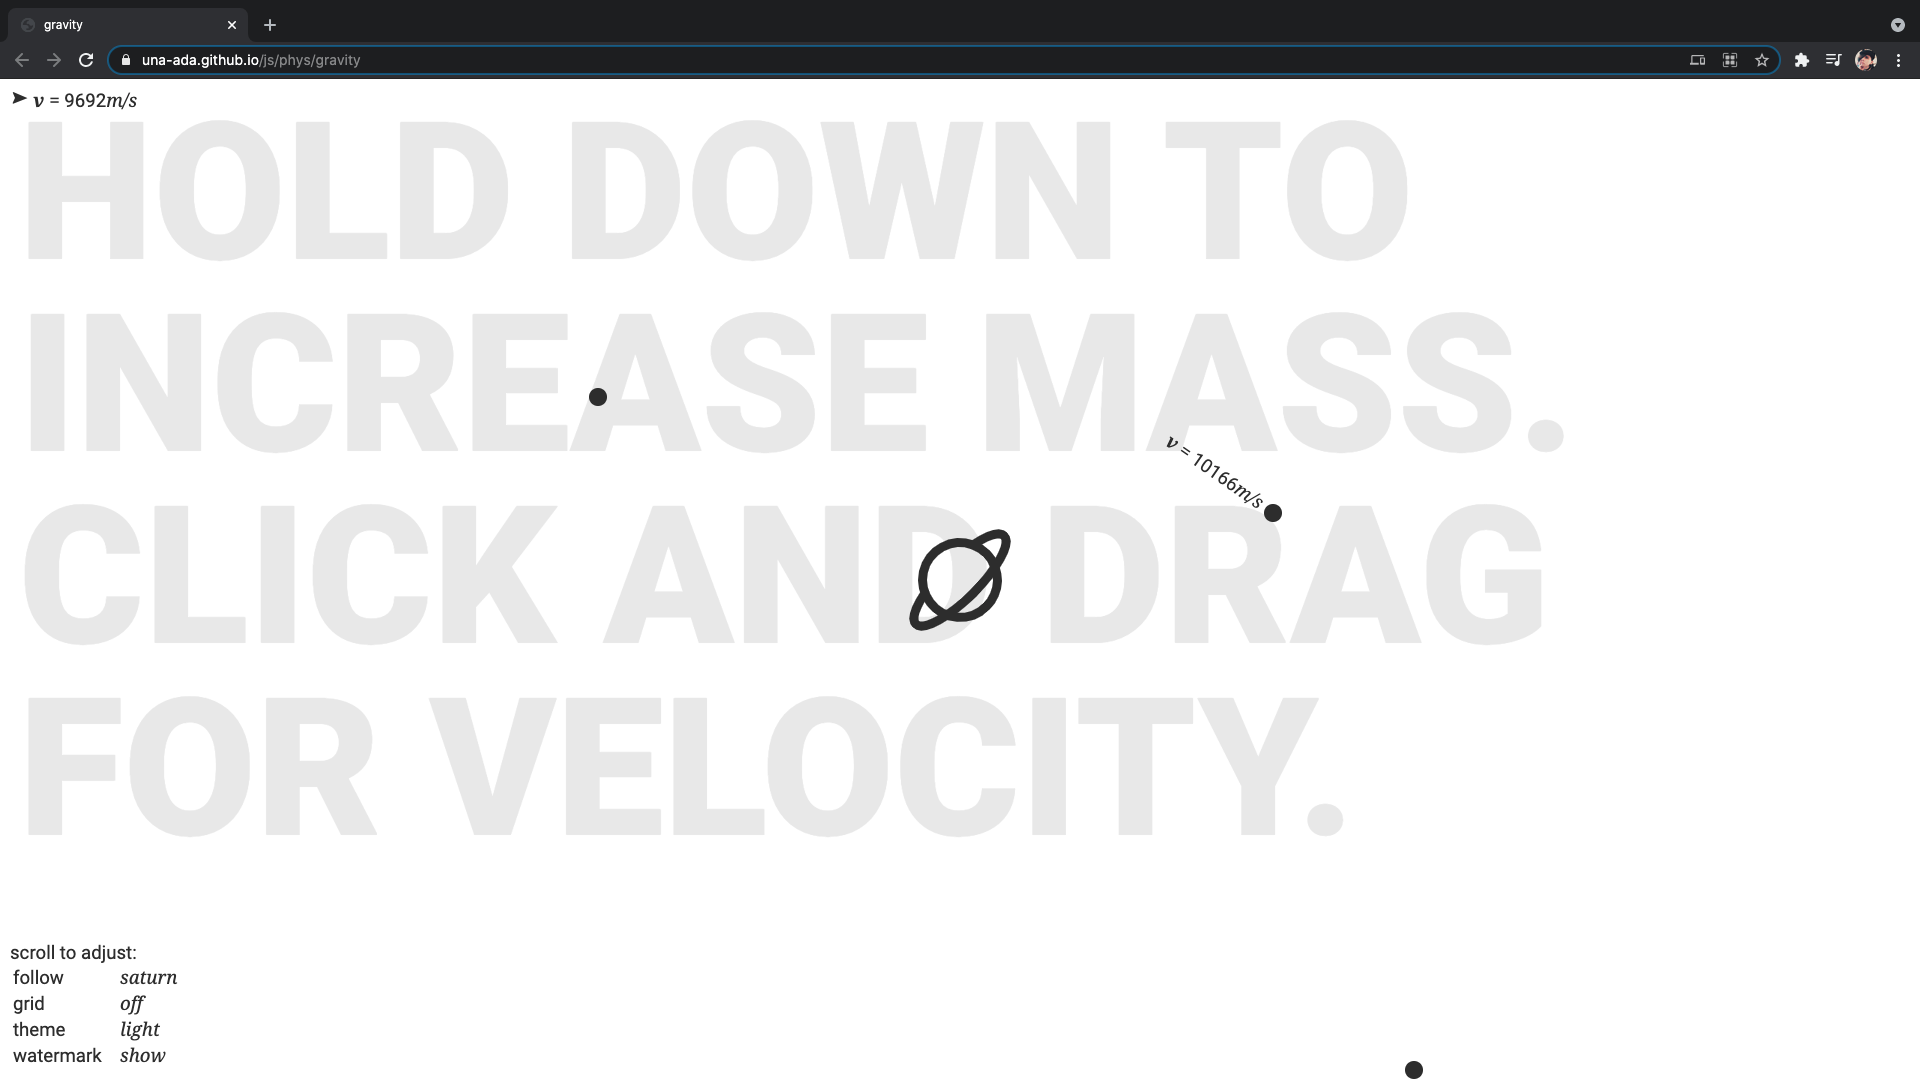
FIGURE 3. User interface of the original “gravity” page showing the user
dragging the mouse to set velocity on a new moon.
I-2. Issues
This is cool, but far from perfect. Let’s go over a few reasons why, so you can stop admiring it so much.
First off, there’s no collision detection, which might sound like a feature request rather than a bug if it weren’t for physics. See, without collisions, the center of mass of two objects can get really close, and with inverse squares this means the gravitational force will be raising exponentially, thus the acceleration and the velocity will get pretty high. Basically, things get close then fly off screen because that makes them go super fast.
Next, right click. The event handlers do not know what to do about right clicking. Using right click to make moons and try adding velocity will make the game logic forget which moon is being updated and which isn’t, only barely managing due to the overwriting of variables. After only a few times of doing this, it will completely break, and you can just use the left mouse to draw dots on the screen. This is a bug not a feature; I think it’s funny, but I need to fix it.
Then: the settings. Why the fuck did I think scrolling on the fields was a good way to do settings options? Was it to avoid having to complicate the event handlers? Because I sure seem to have avoided putting in any effort for those in general (see previous item).
Overall, there’s a lot of minor bugs, a few very noticeable ones, and the code for it all is horrendous. Actually, let’s talk more about the code…
I-3. Code Review
Alright, I’m going to go through this step-by-step to discuss the functioning as well as the formatting and such. The basics is that the code is all in a single file, meant to be portable. Well, except for the fonts which use Google Fonts to load in Droid Serif (no longer free), Roboto, and Material Icons:
<link
  href="https://fonts.googleapis.com/css?family=
    Droid+Serif:400i,700i|
    Roboto:400,900|
    Material+Icons"
  rel="stylesheet"
>
… but the images are all loaded in with JavaScript as Base64 strings or SVGs (the blocks are all pretty long, like 11 lines, so I’m cutting them short):
window.gridImg  = "data:image/png;base64,iVBORw0KGgoAAAANSUhEUgAAAGQAAA"
                + "BkCAIAAAD/gAIDAAAAAXNSR0IArs4c6QAAAARnQU1BAACxjwv8YQ"
                + // ...
window.gridDark = "data:image/png;base64,iVBORw0KGgoAAAANSUhEUgAAAGQAAA"
                + "BkCAIAAAD/gAIDAAAABGdBTUEAALGPC/xhBQAAAAlwSFlzAAAOwg"
                + // ...
window.defHBox  = '<svg xmlns="http://www.w3.org/2000/svg" viewBox="0 0'
                + ' 2 2"><circle cx="1" cy="1" r="1"/></svg>';
Then all the CSS is just in the <head> as well, mostly just basic positioning
(put things in their corners) and font styles, but the interesting stuff here
is the planets and moons:
#nav {position:fixed;z-index:100;}
  #planet {position:absolute;width:102px;height:102px;}
  #planet .info {display:none;}
  #planet:hover .info	{display:block;}
  .moon {position:absolute;width:18px;height:18px;}
  .moon .shell {border:9px solid #333;border-radius:50%;
      height:0px;position:absolute;width:0px;}
  .moon.current .shell{height:0px;margin:5px;width:0px;}
  .info {color:#333;height:20px;left:12px;
  line-height:20px;position:absolute;top:-10px;
  width:150px;}
That’s right! It’s all minified, with just a little bit of formatting to match the DOM structure a little bit! For the new version, the CSS will all be in its own file, and each declaration on its own line. In the past, I didn’t have good experience with IDEs that had decent folding, or would just need to see the whole stylesheet at once, or something like that, so I had a tendency to write all my CSS like this and avoid vertical spacing.
I-3.1 Markup
Moving on, the markup is all pretty straightforward, there’s a <div> with the
id #nav, which contains all the game objects. This naming comes from the
history of the project, where this was all meant to be a navigation menu (see
Section I-1). The predefined objects here are Saturn, Titan, and the
Sun, the second of which is probably the best to show the basic structure:
<div
    style="left:calc(50vw - 9px);top:calc(50vh + 398px);
        width:18px;height:18px;"
    class="moon"
    direction="0"
    mass="1.35e23"
    name="titan"
    velocity="15.26e3"
>
    <div class="shell" style="width:0px;height:0px;">
        <div class="info" style="top:-10px;left:12px;"></div>
    </div>
</div>
You’ll see a lot of attributes here, which are used in the game logic, implying
(correctly) that the game data was mostly stored in the DOM. Funny. Saturn, on
the other hand, does not have this div.shell child, instead being styled with
an embedded SVG; it also has a defined hitbox element in it, which was
intended to be used when I added collision detection, but that never happened.
And finally, there’s the settings and such, mostly divs which are positioned
in the corners, but the structure of the settings menu is notable:
<table>
    scroll to adjust:
    <tr id="setting-fllw">
        <td>follow</td>
        <td>
            <span class="setting">
                <span class="unit">saturn</span>
            </span>
        </td>
    </tr>
    <tr id="setting-grid">
        <!-- table row... -->
    <tr id="setting-theme">
        <!-- table row... -->
    <tr id="setting-wmark">
        <!-- table row... -->
</table>
Why is the text node a direct child of the <table>? Nobody knows!
I-3.2 Game Loop
The JavaScript all starts with this little thing:
window.addEventListener('load',E_.start(()=>{
  window.scale = E_.phys.scale;
  for(let e of nav.children) E_.phys.register(e);
}));
which calls E_.start, passing in a callback which just shallow copies the
E_.phys.scale into the window namespace, for scope reasons, I guess, then
registers all children of the div#nav element. That initializing function is
the interesting part here, annotated for convenience:
start	(startup=()=>{},callback=()=>{}){
  startup(); // call startup function
  // define a steps array for the game
  E_.steps = [
    E_.render
  ];
  // define a steps array for physics
  E_.phys.steps = [
    E_.phys.gravity,
    E_.phys.move
  ];
  E_.settings(); // initialize settings
  E_.phys.loop(); // start physics loop
  E_.loop(); // start game loop
  callback(); // callback
},
These loop functions are pretty nice:
running	: !0,
loop	(){
  // loop on animation frame if running
  if(E_.running)
    requestAnimationFrame(E_.loop);
  // generator function to step through E_.steps
  E_.step = (function*(s){
    for(let i of s)
      yield i;
  })(E_.steps);
  // run next step
  E_.step.next().value();
},
Could use some fixing up, but hey it works and is quite scalable. This time around, though, I’m going to experiment with different ways to do this other than just using a generator function.
That’s about it for the interesting code, to be honest, the rest is pretty much canonical. Render things where they should be, move things when they need to, etc. I don’t really care to keep going on about this, but check this shit out, lmao:
numAbbr(n,f=3,l=false){
  if(l&&(""+~~n).length<f+4) return ~~n;
  var tm;
  return (tm = ""+~~((10**f)*(n/10**~~Math.log10(n)))/(10**f))
    + (""+E_.display.zeroStr(f+2-tm.length))
    + "e" + ~~Math.log10(n);
},
II. Planning
What needs to happen then? First, features: this isn’t a game, it’s a toy, and it needs to become a game. I’ve considered this before, but it’s what ought to happen now to meet the requirements for the assignment. Also, collisions, for any sort of game mechanic, I’m going to need to be able to check hitbox intersections.
Beyond that, the code needs to be completely rewritten. I don’t like what it is now, it’s hard to expand upon, it needs a rewrite. Keeping future work in mind, I’m going to do this with some modularity, e.g. using modules. Now then, onto the specifics…
II-1. Wireframe
This part was pretty basic, it’s mostly just the original’s layout with the settings moved to what will hopefully be a dialog, a link to the repo, a “lives” counter, and a game message display. The gameplay elements are also new, drawing areas for both the starting region where the player will create the moon to put into play and a target region where they should be aiming.
This is pretty straightforward, since I’m just applying the basic concepts of what makes a game: rules to restrict the player (starting area, lives) and goals (target area).
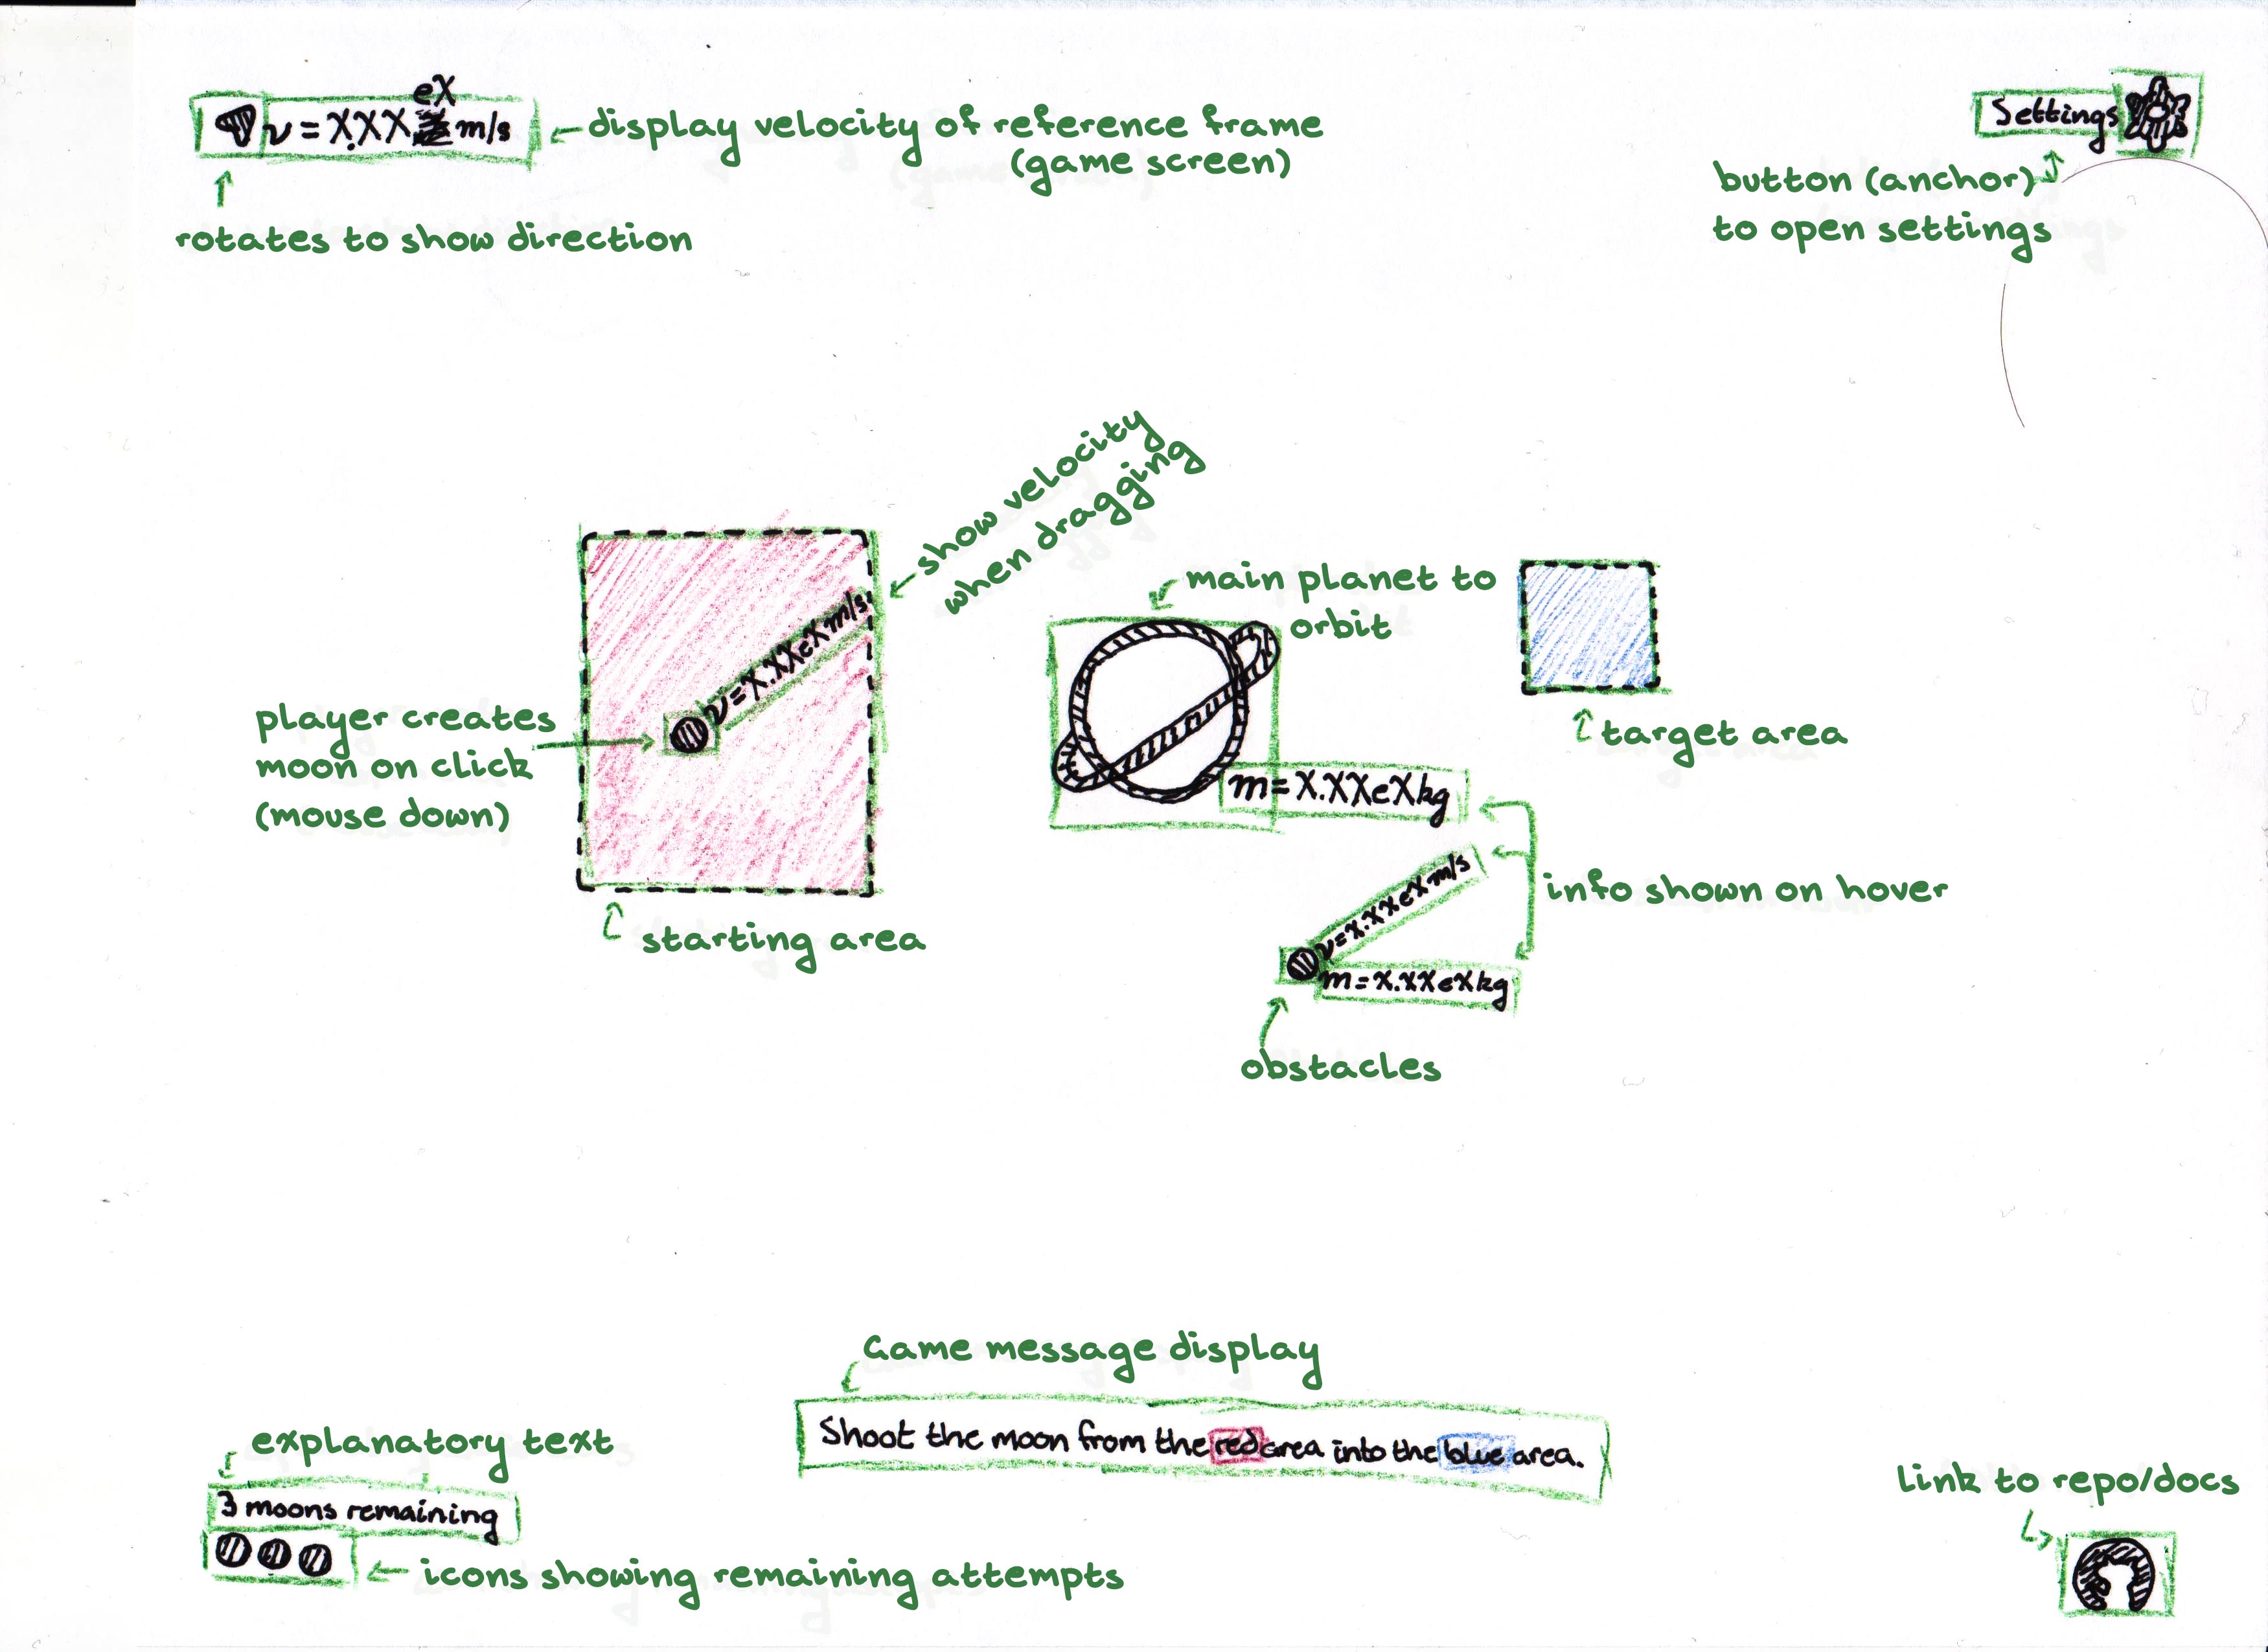
FIGURE 4. Wireframe with text fixed.
II-2. Pseudocode
If I had actually written this blog as I was working on these things, this would have been a lot more in depth, as the pseudocode for the new version is basically just the outline of the old version reorganized into modules. I am, however, too lazy at this point to write a more complete code review and explain how each function is being moved, so just take the pseudocode and run, I say:
II-2.1 main.js
- Import modules
- physics engine (Physics.js) →
phys - renderer (DOMRenderer.js) →
renderer - game logic (Game.js) →
game
- physics engine (Physics.js) →
- Define constants (instances of modules)
- Cache DOM elements
- Initialize game
- Pass elements into
init() - Initialize
renderer - Append
renderer.containerto DOM - Initialize
game(pass inrenderer) - Initialize
phys(pass ingame) - Add event listeners to
renderer.containerto updategamestate
These should probably be functions in thegamemodule.mousedown→trueon mouse being down- cache mouse position as
Object
mousemove→ current mouse position asObjectmouseup→falseon mouse being down
- Start
physloop - Start
gameloop
These need to be separate because physics simulation is time based but the renderer is based on animation frames.
- Pass elements into
II-2.2 DOMRenderer.js
- Define
containerElement - For each type of object in the game
- Define initializing
function
Take in the attributes the item has according to the model and create anElementmatching that description. Append thisElementto thecontainer - Define setter
function
Afunctionwhich will update the DOMElement(view) to match the model ingame.
- Define initializing
- Initialize UI
- Create
Elementfor …- settings menu
- settings button
- repo/docs link
- velocity display
- “health” display
I’m calling this “health” as a convenient analogy, it will really be a number of attempts remaining to get the “moon” into the target area. - game messages display
- … and append to
container
- Create
- Define renderer update
function
This could possibly be completely removed. I’m not entirely certain at this point, but it might be possible to have the renderer define something like a setter on the game objects… not sure how I feel about the idea yet, since the physics engine will likely be the one updating a lot of the model rather than thegame.- Update displays according to
gamestate:- velocity
- “health”
- game messages
- Update game objects
- remove
Elementif absent fromgamestate - update attributes to match state
- add
Elementif newly added togamestate
Not entirely sure how this will go at the moment, either caching render states or setting a flag on the renderer’sObjectfor the game object to show that it has not been rendered yet.
- remove
- Update displays according to
II-2.3 Game.js
- Define constants
- Same position threshold for mouse positions
- Mass increment rate
- Define state
Objectto hold game objects
Game objects will have a class, with extensions for each sort of object, and each will have mass, velocity, position, hitbox, and an array of collisions.- Current level
- “Health”
- Is mouse down?
- Cached mouse position on
mousedown - Current mouse position
- Is creating “moon”?
- Define initialization
function- Save
rendererreference - Re(set) current level
- Import level information
This should be some sort of data file describing how each level works, the initial state of any obstacles, the starting area, the target area, the allowed number of attempts, if custom mass is allowed, and the game message. - Not sure what else this needs to do since most variables would be managed by level loading. Perhaps load some sort of splash screen? Load settings from a cookie?
- Save
- Define level loading
function- Remove all game objects
- Set state according to level data
- Define game loop
function- If mouse is down
- If not creating moon and health isn’t zero
- Is creating moon
true - Create instance for new moon
- At cached mouse position
- No physics
- Is creating moon
- If creating moon
- If current position within threshold of cached position and level allows
custom mass- Increment mass of moon by mass increment rate
- Else calculate velocity from change in mouse position between cached and
current
This will be aphysfunction, for scaling reasons.
- If current position within threshold of cached position and level allows
- If not creating moon and health isn’t zero
- Else (mouse not down) if creating moon
- Is creating moon
false - Turn on physics for moon
- Remove one from “health”
- Is creating moon
- Check for game object collisions
- If moon collides with object
- Remove moon
- If health is zero and no other moons LOSS CONDITION
- If moon collides with target area
- WIN CONDITION
- Other conditions should probably be handled somehow!
- If moon collides with object
- Call
renderer.update - Call back to loop on next animation frame
- If mouse is down
- Defining game object classes should probably be deferred to separate files, see previous notes on what those might look like.
II-2.4 Physics.js
- Define constants
- Gravitational constant
- Position scale (pixels to meters)
- Velocity scale (pixels/second to meters/second)
- Time scale
- Define gravitation
function- For each game object (1)
- For each other game object (2) add calculated gravitational acceleration multiplied by the time scale to the object (1)’s velocity
- For each game object (1)
- Define move objects
function- For each game object update position based on velocity and time scale
- Define check collisions
function- For each game object (1)
- For each other game object (2)
- If hitboxes intersect, log other object (2) to object (1)’s collisions
- For each other game object (2)
- For each game object (1)
- Define physics loop
- Call gravity
- Call move
- Call check collisions
- Call back to loop after timeout
Timeout will probably be set to 1/60th second, this is probably pretty similar to the animation framerate but if this is dependent on that the time scales get weird for some reason (I’ve tested it before).